Tuesday 31 May 2016

Pattern Review: Harlots&Angels Asylum High-Backed Adventurer's Corset

I've had this pattern in my pattern drawer for a while now, but never really came around to making it. I bought it around 2011, together with a hat pattern & kit, because I liked the high back and had always wanted to make a vest corset.
It's a rather modern corset pattern, targeted mostly at Steampunk costumers.

Originally I had wanted to use an asia-style jacquard with butterflies that has been waiting in my fabric boxes for a project to come along for more than 10 years now...but at the moment I quite like wearing shiny non-fabrics like leather or PVC, so I picked a pseudo-snakeskin-patent-leather to work with. For lining and strenght, I chose a plain cotton coutil and doubled the patent leather with cotton drill. I still had some buckles salvaged from an old pair of boots (never throw anything away!) and only had to order some more steel.

And of course, this was another project for WGT.


Instructions:
The design and layout of the pattern and instructions are not well done at all. All illustrations are drawn by hand and not always clear, especially when it comes to the part how the boning channels are constructed. Some printed instructions are cut off by the layout so that only the upper half of the line is printed, which makes it unreadable. At some points this has been corrected by hand - quite sloppy.

There is no clear indication about how much sewing allowance is included. Apparently, for most seams it is 2cm, for some others 1.5cm or 0.5cm. For me, that makes the whole process quite error-prone.


Construction:
If following the instructions, the corset busk is sewn in in a way I've never seen before using button holes - I preferred to stick to my usual method. However, I've heard from others that this method works well.  Actually I did that for most part of the corset: I just stuck to my usual corset construction method to put everything together.
What was very annoying was that some pattern pieces don't match up. One of the two pieces is simply longer and there are no notches or any other markers on the seamlines to indicate how the pieces are supposed to fit together.
I also made some modifications on the straps: the part facing the neckline was supposed to be hemmed with bias tape. I preferred to sew upper fabric and lining together and turn them inside out.


Fit:
The fit of the bottom half, the actual corset, is okay for me, but I wonder if the upper part was designed for a Valkyrie or professional swimmers (mind you, with a 50cm waist). The shoulders were around 10cm too wide for me and I had to cut away a lot, the back parts were way too long and probably designed for someone at least 1,75 tall.
The way it is cut is not designed for much waist reduction, the way it is curved it will probably exert a lot of pressure on the lower ribs as well - not really comfortable.

All in all, I'm not sure if the pattern saved me much time. I had to modify so much, I might have just as well taken one of my existing corset patterns and extended it at the back. I definitely cannot recommend this pattern, especially not for beginners who do not know how to adapt a pattern to fit well. Harlots and Angels seems to have quite a wide range of patterns and for that I would have expected a much more professional product. I am aware that creating a pattern in a range of sizes takes a lot of work - but I've sewn patterns from non-professionals that were of a much higher quality.


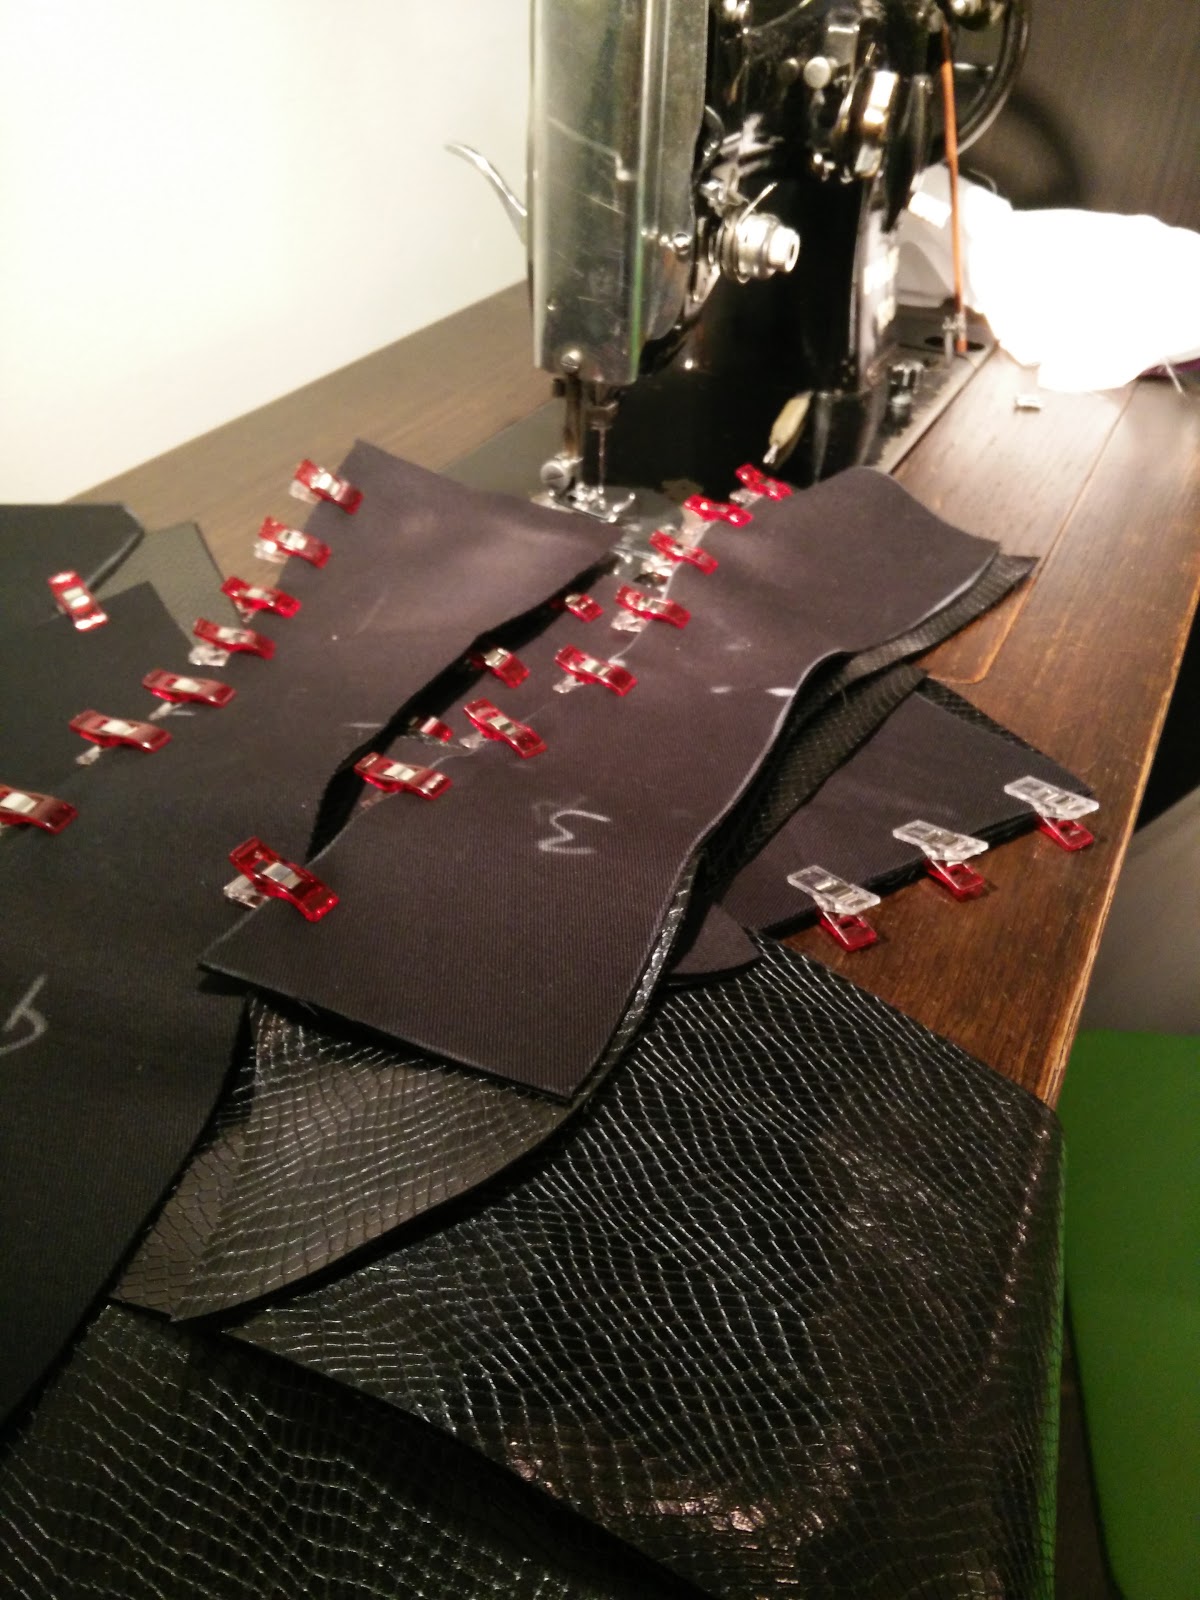
However, I do like my result. The patent leather I used is notoriously tricky to work with, as you can't really use pins or undo seams without leaving behind holes in the fabric. I mostly used Wonder Clips for keeping the fabric together, that worked quite well. But the material behaved very nicely, and the corset turned out very neat and, once I had modified the pattern, very well-fitting. On the mannequin there's quite a lot of wrinkling in the fashion fabric, on myself it's not as bad.
I am especially proud of how neat the bias tape turned out, barely any seams are visible :)
At WGT, with a Halo and a fishtail skirt I made ages ago. The outfit was intended to be completely different, but the cold weather completely crossed my plans.

Monday 30 May 2016

Sewing for WGT: The Knipmode Corset

The previously posted neck corset was of course part of a larger outfit I made for Wave Gotik Treffen this year. I had been itching to finally make another corset (not that I have much opportunity lately to wear one...) ever since I had ordered engraved corset busks from Vanyanis in Australia.


The Dutch sewing magazine Knipmode had in its November 2015 issue a corset pattern with hip gores that I really wanted to try out. The pattern was part of the collection of the winning team of the dutch version of The Great British Sewing Bee (or something along these lines, if I understood it correctly) and all of the designs, most of them using patent leather and black fabrics, went straight into my To-Sew-List.
The corset pattern is an overbust corset and I had only made 2 of those so far, and both of them weren't exactly a success when it came to fitting: the first one turned out too small around the bust, the second one had way too much space, requiring me to add A LOT of padding thus giving me monster-boobs.

First step: make a mock-up. And just as expected, even though I cut the smallest size, the mock-up turned out way too big, especially at the waist. I guess because the pattern is targeted at a fairly mainstream audience, you can't really intend it for tightlacing anyway. And since the dutch sizes tend to run bigger than usual sizes (what with dutch girls being generelly quite tall and broad-shouldered), the size 34 came with a 62 cm waist. My natural waist is 64cm, so I ended up taking away around 10cm around the waist. I also added some length to the bust, so I could change the upper edge into a slightly more dramatic shape.


Since I didn't want any external boning channels like the corset in the magazine had, I constructed the corset in my usual manner and sewed the boning channels to the inside of the coutil lining. I prepared the upper layer from silk fused to a strong cotton fabric, and then inserted the busk:

Next, I topstitched along all of the seams on the outer layer, to connect it with the coutil lining. And then the trouble started. When I had

I don't know what happened - probably my seams weren't exact enough, my changes in the pattern introduced some errors, I maybe didn't cut the fabric exact enough. I don't know. But the corset had so many bumps and wrinkles when I first put it on, that I suffered from a minor nervous breakdown. So I left it for several days in the corner where I had thrown it and did something else.

This is not how it's supposed to look like.
Eventually, I unpicked some of the topstitching, carefully repinned everything, and could eliminate at least some of the wrinkles. I had planned a lace overlay for the corset anyway, so some of my errors are less obvious now that they're covered with lace.


The lace overlay took some work in arranging and careful symmetrical pinning to the corset. And of course, lots of handsewing.


About the pattern and instructions:
The instructions in the magazine are very detailed, with recommendations for material and clear illustrations about what you're supposed to do. I didn't really follow them, but I probably should have at least read them a little more thoroughly (the recommendation to *first* sew in the hip gore parts, *then* close the side seams would have made my life a lot easier, I think).
My one issue with this pattern is with the fit: It really runs quite big and does not give such a nice shape in its original state. I like corsets with hip gores as they tend to have a rather large hip spring, but if there is no reduction whatsoever around the waist, the whole affair resembles more a barrel-shape than the hourglass you want to have.
The bust area, however, fits really well. I did add some foam cups inside to give me a nicer cleavage.
I think I could still have taken away more width from the corset, at the moment I can easily close it fully and it could really fit a little more snugly.


Sadly, WGT this year was so horribly cold, that I could only wear my outfit without a jacket for the 2 minutes it took to take this picture. I'm wearing it with a skirt I made a couple of years ago, and a headdress I made for Castlefest last year.
I may still embroider some beads or flowers onto the lace to give it some more bling - but without any opportunities to wear it coming up, I don't have any pressure for this...
Eventually I also want to make a matching skirt - I still have plenty of silk and lace here. I might have managed to throw something together before the festival, but with such a beautiful and expensive material, I really didn't want to risk another disaster :)